Using Rollers to Style Wigs
Welcome back to our Pictorial Guide to Rollers – if this is your first time here, you might want to review the fundamentals of rollers and technique in Parts 1, 2 and 3 before jumping in here.
I’m going to use rollers to recreate an Elizabethan ladies’ hair style. I’ve chosen a relatively simply style from the era but one that was also very common. I’m going to use a human hair wig for the demonstration, but the fundamentals hold true to one’s own hair as well.
Before you start, take a few minutes to break the style into its parts and pieces. Decide what size rollers you to use in each section, how many you’ll need to get the correct density and texture and what direction they should go. Make a plan before you start and the process will go much more smoothly.
A final note – often, we cannot see the side or back views of a hairstyle. When this happens, do a bit of research into the overall styles and silhouettes of the era and see how the invisible parts are treated elsewhere. That way, you can make an educated choice about your style based on trends of the era.
Consider the accessories or hat you’ll be wearing, or other items of clothing that might impact your hairstyle.Our research image has a large cap or hat on the top back of the head – you’ll want to either have your own hat handy to test the style out with the hat, or you’ll need to prepare yourself for how the style will look with that component missing. Also, the large whisk in this image would definitely effect the hair styling, so consider if you’ll be wearing something similar, as you’ll want to make sure your style is closer to the head to avoid hair getting caught in your whisk or collar.
This style has no defined part, the hair goes straight back from the face into some sort of bun. So I’m going to divide the hair into a front and a back section, because those two areas of the hairstyle have very different styles and so need different size and styles of rollers
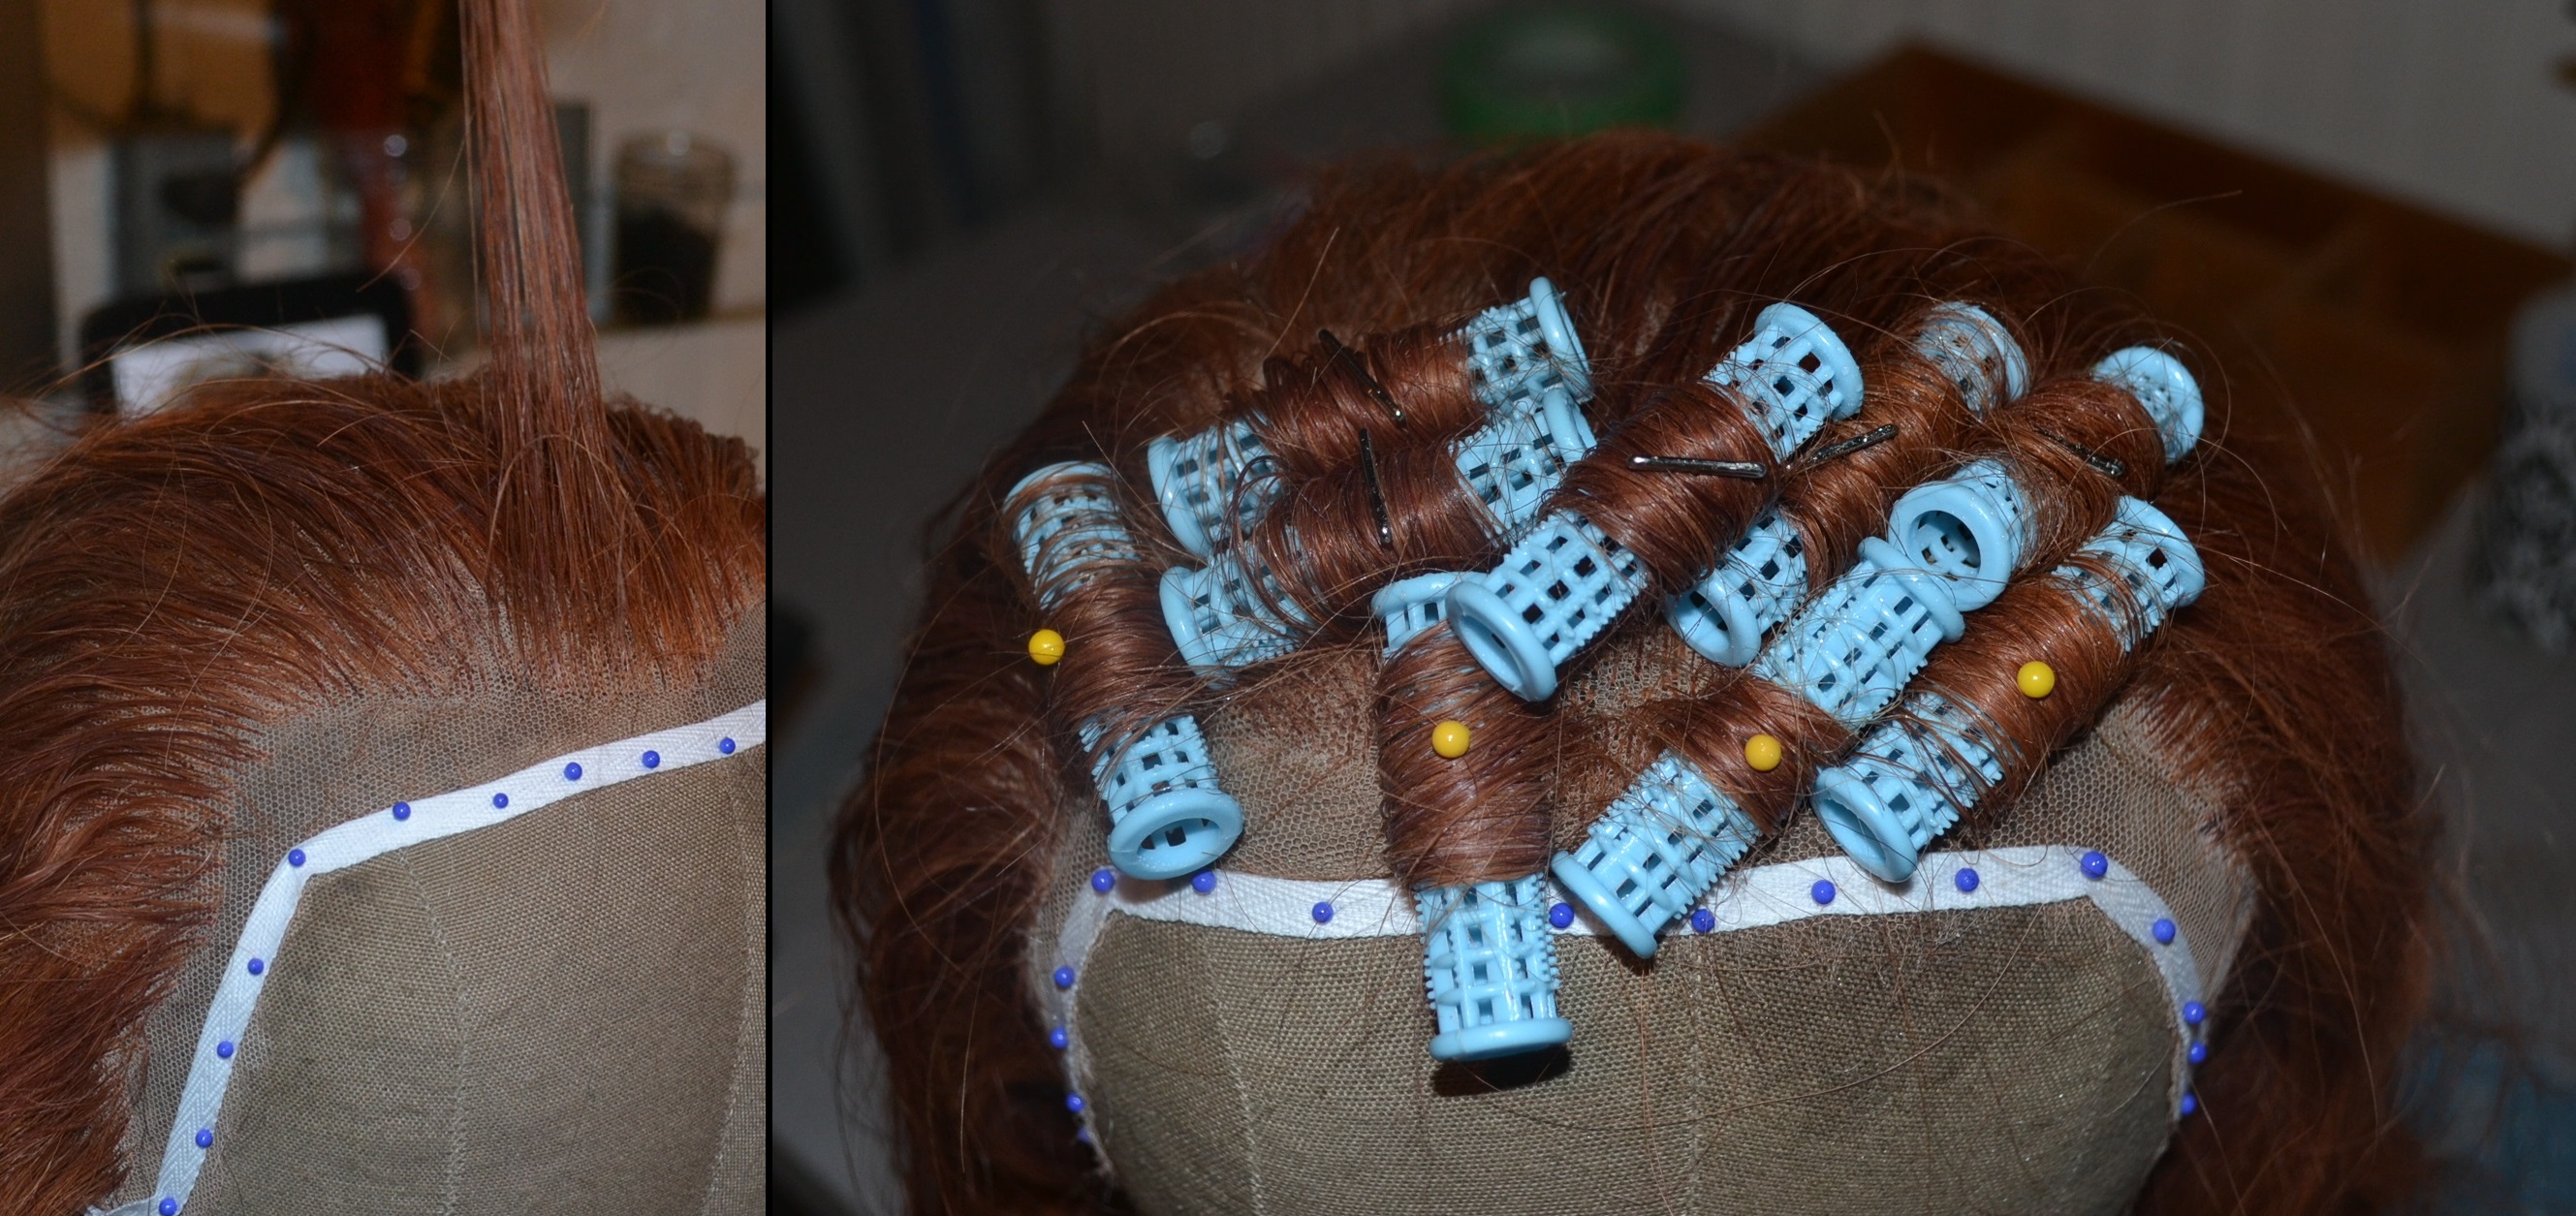
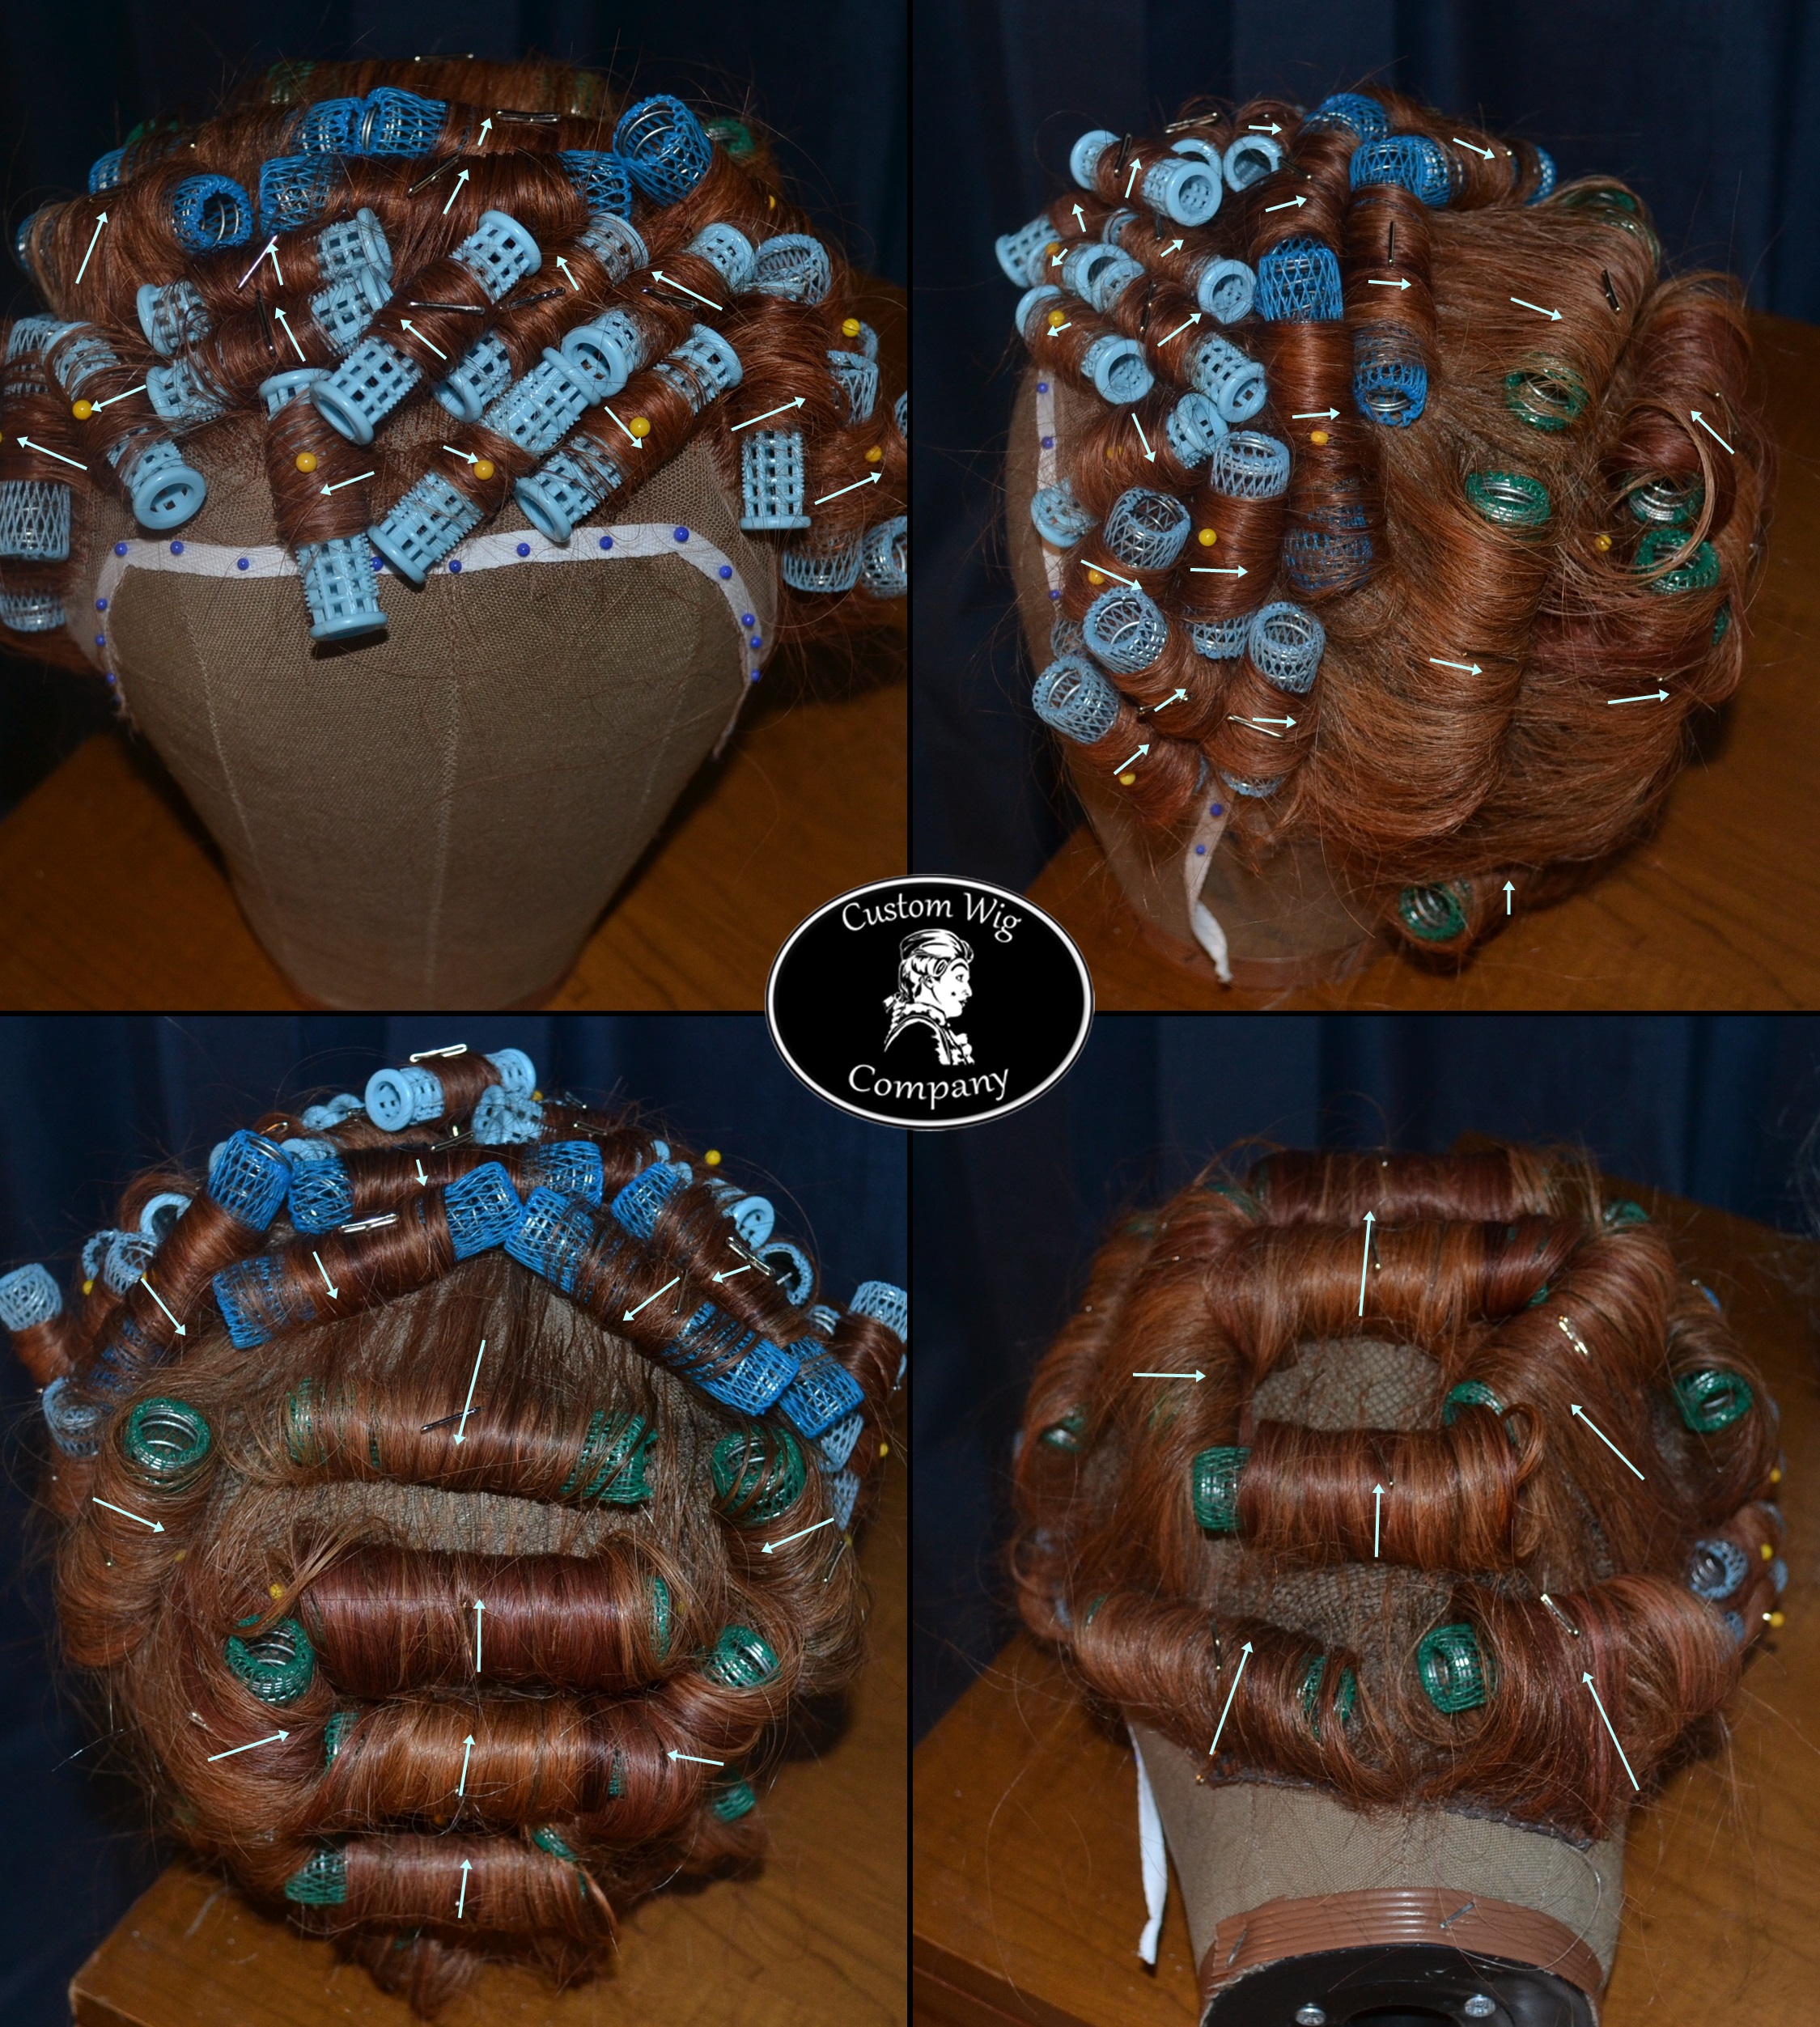
In the photo above, you can see (on the left) the size of strand of hair I put onto each roller. While I could have used fewer rollers and broken the curls up, using more, smaller rollers will produce a better result. On the right, the whole front section is on tiny rollers. Further down you’ll find a composite image showing the whole head of hair in rollers, which will include the direction the hairs are wrapped, so for now, just take note of how many rollers I packed into the space. If I used even smaller rollers or perm rods, the resulting curls would be even tinier and frizzier but since the inspiration image features fairly defined curls, I chose this size.
I rolled the entire front section on those little rollers, and then I transitioned to a slightly larger roller, which you can see in the photo below. I used four of these rollers to transition the hair from a pile of tight curls into smooth waves, so that the hair would form a roll before integrating into the bun on the back. You can see that in the photos of the roller set below. The light blue rollers are wee, the darker blue rollers are a little larger, and the green rollers are bigger yet, and used only for the part of the hair that will be in the updo.
Once the front section was on rollers, and the transitional section was rolled, I took the back section and put it into a roller patter that would help it go easily and prettily into the bun. You might not think that hair needs to be rolled in order to make a bun, but doing so will make the process much easier and give the bun a far nicer presentation.
In the quad composite above, you can see the roller pattern for this style, from all the angles, including arrows to indicate the direction the hair is wrapped around the roller. Remember, rollers aren’t just there to make hair curly – they also help direct the hair the way you want it to go.
Taking the Rollers Out
Once the whole head is rolled, let the hair dry completely. If you can put it into a wig dryer or use a hair dryer to get some heat on it, it will dry more quickly and the set will be better. Regardless of how you get it there, the hair must be completely dry before you unroll it or you style will not hold.
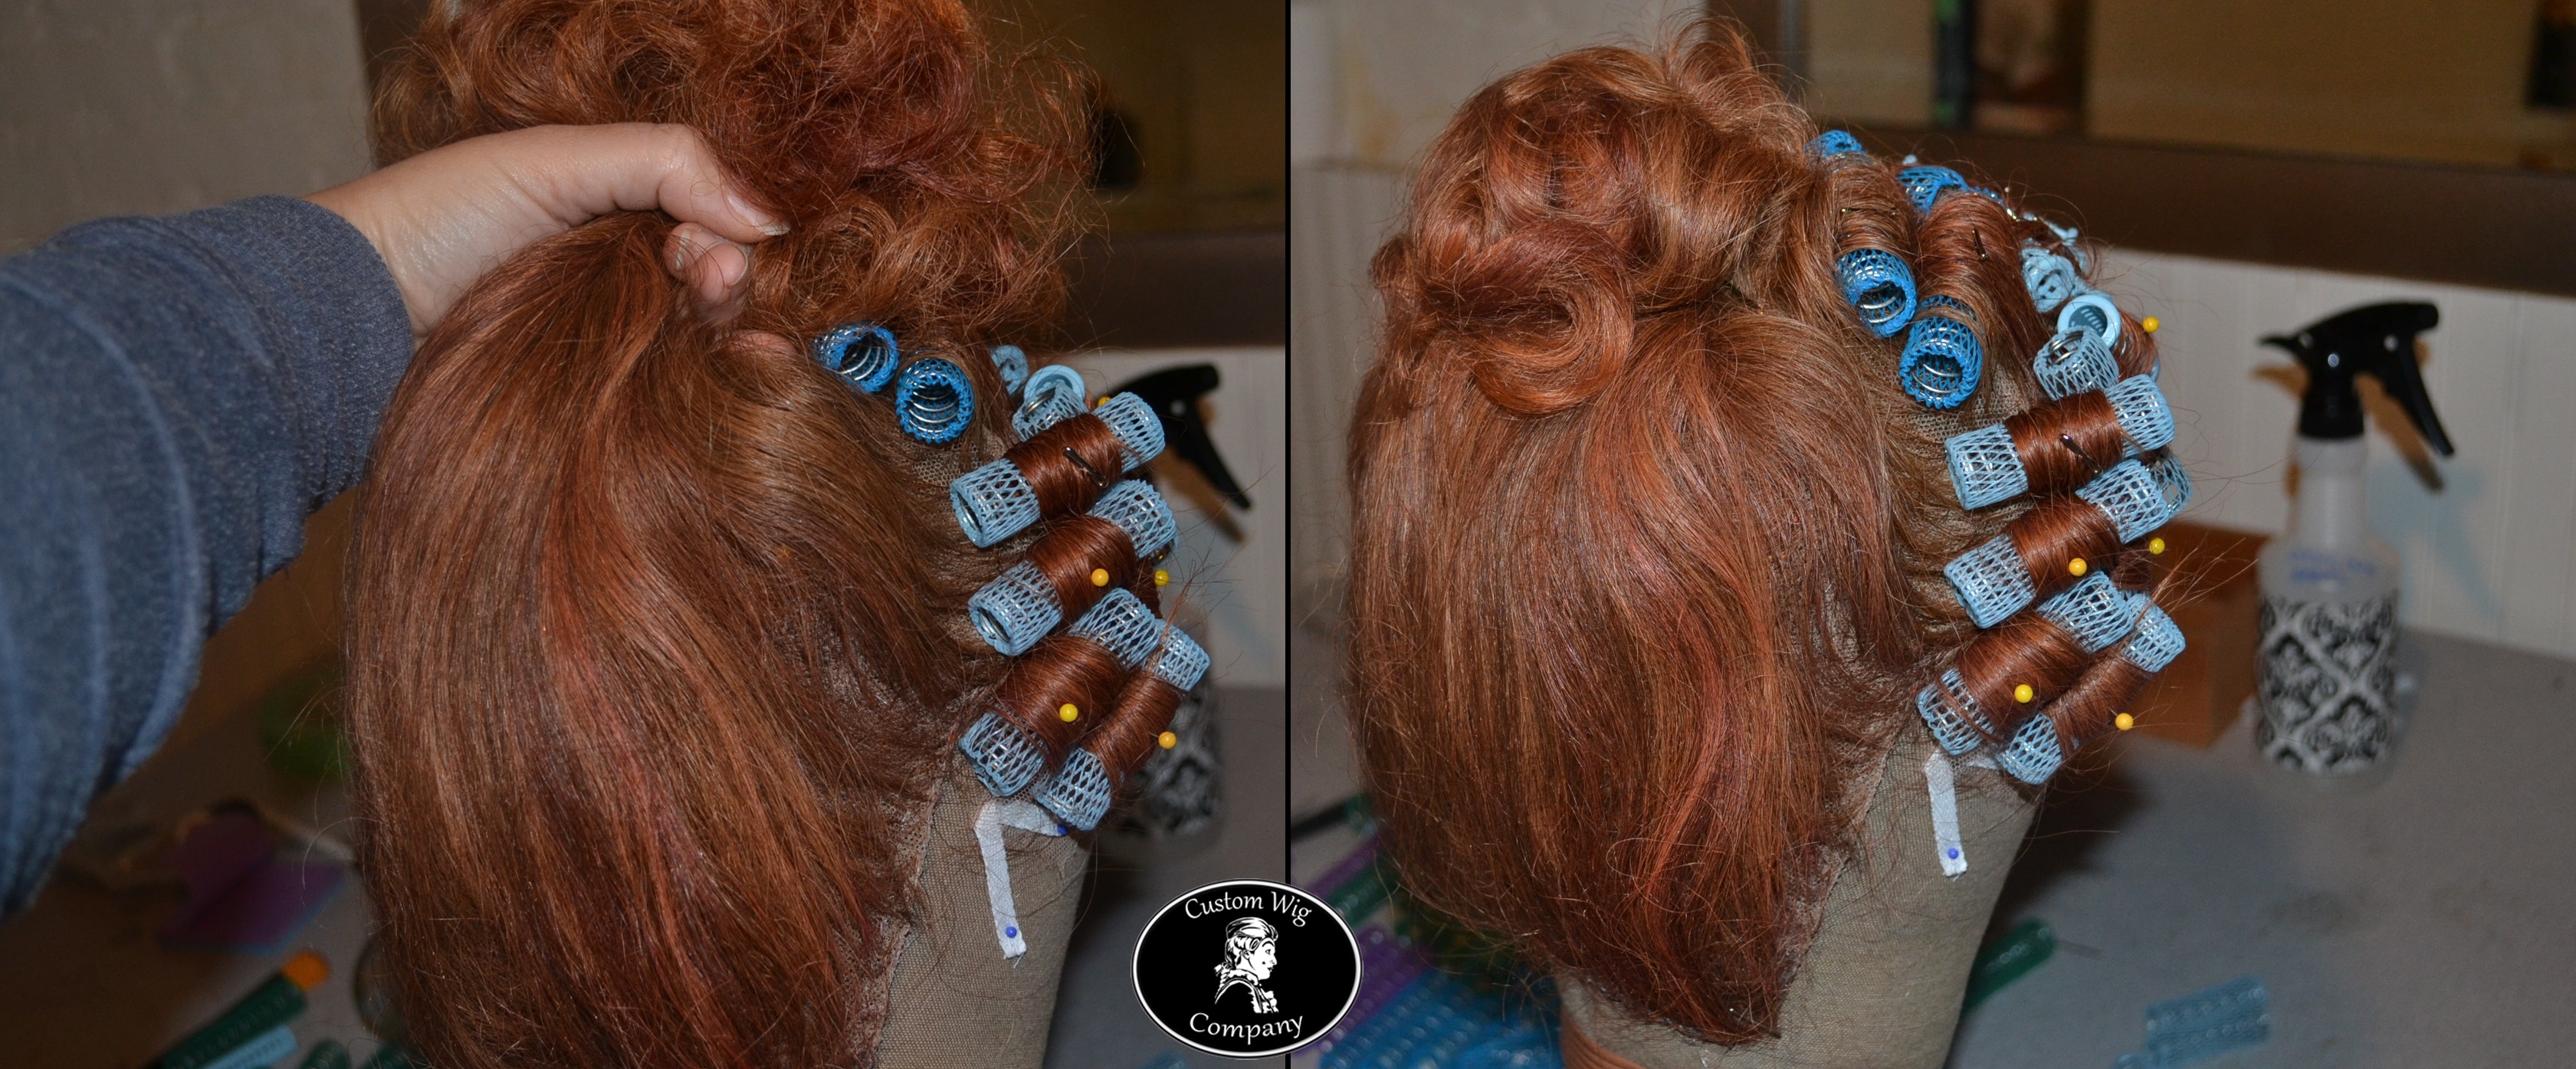
I generally take the back out first and deal with it before moving on to the front. I might need to come back and adjust the back somewhat once the front is styled, but it’s just easier to go ahead and get the bun in place before tackling the front – plus it gives you a visual landmark for the rest of the style. Since the updos in this era were fairly high on the head and pretty clean and tight, I just took all of the rollers out and then smoothed and combed the whole back section up to where I wanted the bun to be. See the photo on the left below. Once I had it smoothed out and where I wanted it, I just rolled the hair under and pinned it in place, as in the right photo below.
After the bun is positioned, unroll the four medium blue rollers, and comb them out. You want the hair to come together smoothly and form a nice roll. Keep working the section of hair with your wide comb until you are happy with the overall smoothness, then pin it in place. You’ll be adjusting this before the end, so just pin or clip it enough to keep it in place while you do the front. The photos below show the hair taken from rollers, and then combed and rolled under, butted up to the bun.
Now, the fun part! You get to take out all of the wee rollers up front and play with the curls. In the photo below, you see the hair unrolled (far left). Notice that I was careful to remove the rollers in such a way that the curls stayed intact. Once the hair is out of the rollers, you want to break the curls up more and loosed the hair up so that it starts to take on that fluffy, cloud-like quality. The easiest way to do this is to simply use your fingers to break each curl into smaller strands. Int the middle picture below, I’ve done that to the left side of the wig so you can see the difference. The third photo shows the whole section picked through.

A few final thoughts –
- I used small bobby pins to secure the bun, the roll and the rats. I used hairpins to secure the curls over the rat and around the face.
- If you are going to put a cap or hat onto the hair, do a trial run of it before you pin the style firmly in place – you may find you need to adjust part of the bun to accommodate the cap.
- The hair in this wig is all at least 16″ – that length makes getting those small, tight curls more challenging. But using small rollers and pinning the long curls in place lets you use the whole long strand of hair as though it were two or three shorter pieces.
- If you are styling a wig, be prepared to have to make adjustments to the style once you put it on -this is pretty much inevitable since putting the hair onto a head and face will affect the overall look and proportions.
- You can make the rats bigger and get a large style. You can also use the rats under the roll or bun if you want it to be larger.
Join me again next week when I break down a new style and show you how to recreate it. And be sure to check out the first three parts of our Pictorial Guide to Rollers if you haven’t already!
After you get the curls broken up, you can arrange them around the face and in front of the bun. This will start to form the style. If you want a very simple style for the era, you could stop here and simply pin the curls in place. You can see how that looks in the composite photos below.
While the above is ok, it’s not really the right scale for our inspiration image, and it would be dwarfed by the large dress and whisk. You might wonder where to go from here, since you’ve done everything you can to the hair. The answer is to get a little help from rats! Not the kind in the sewer, of course, but the kind women have been using to augment and structure their hair for millenia.
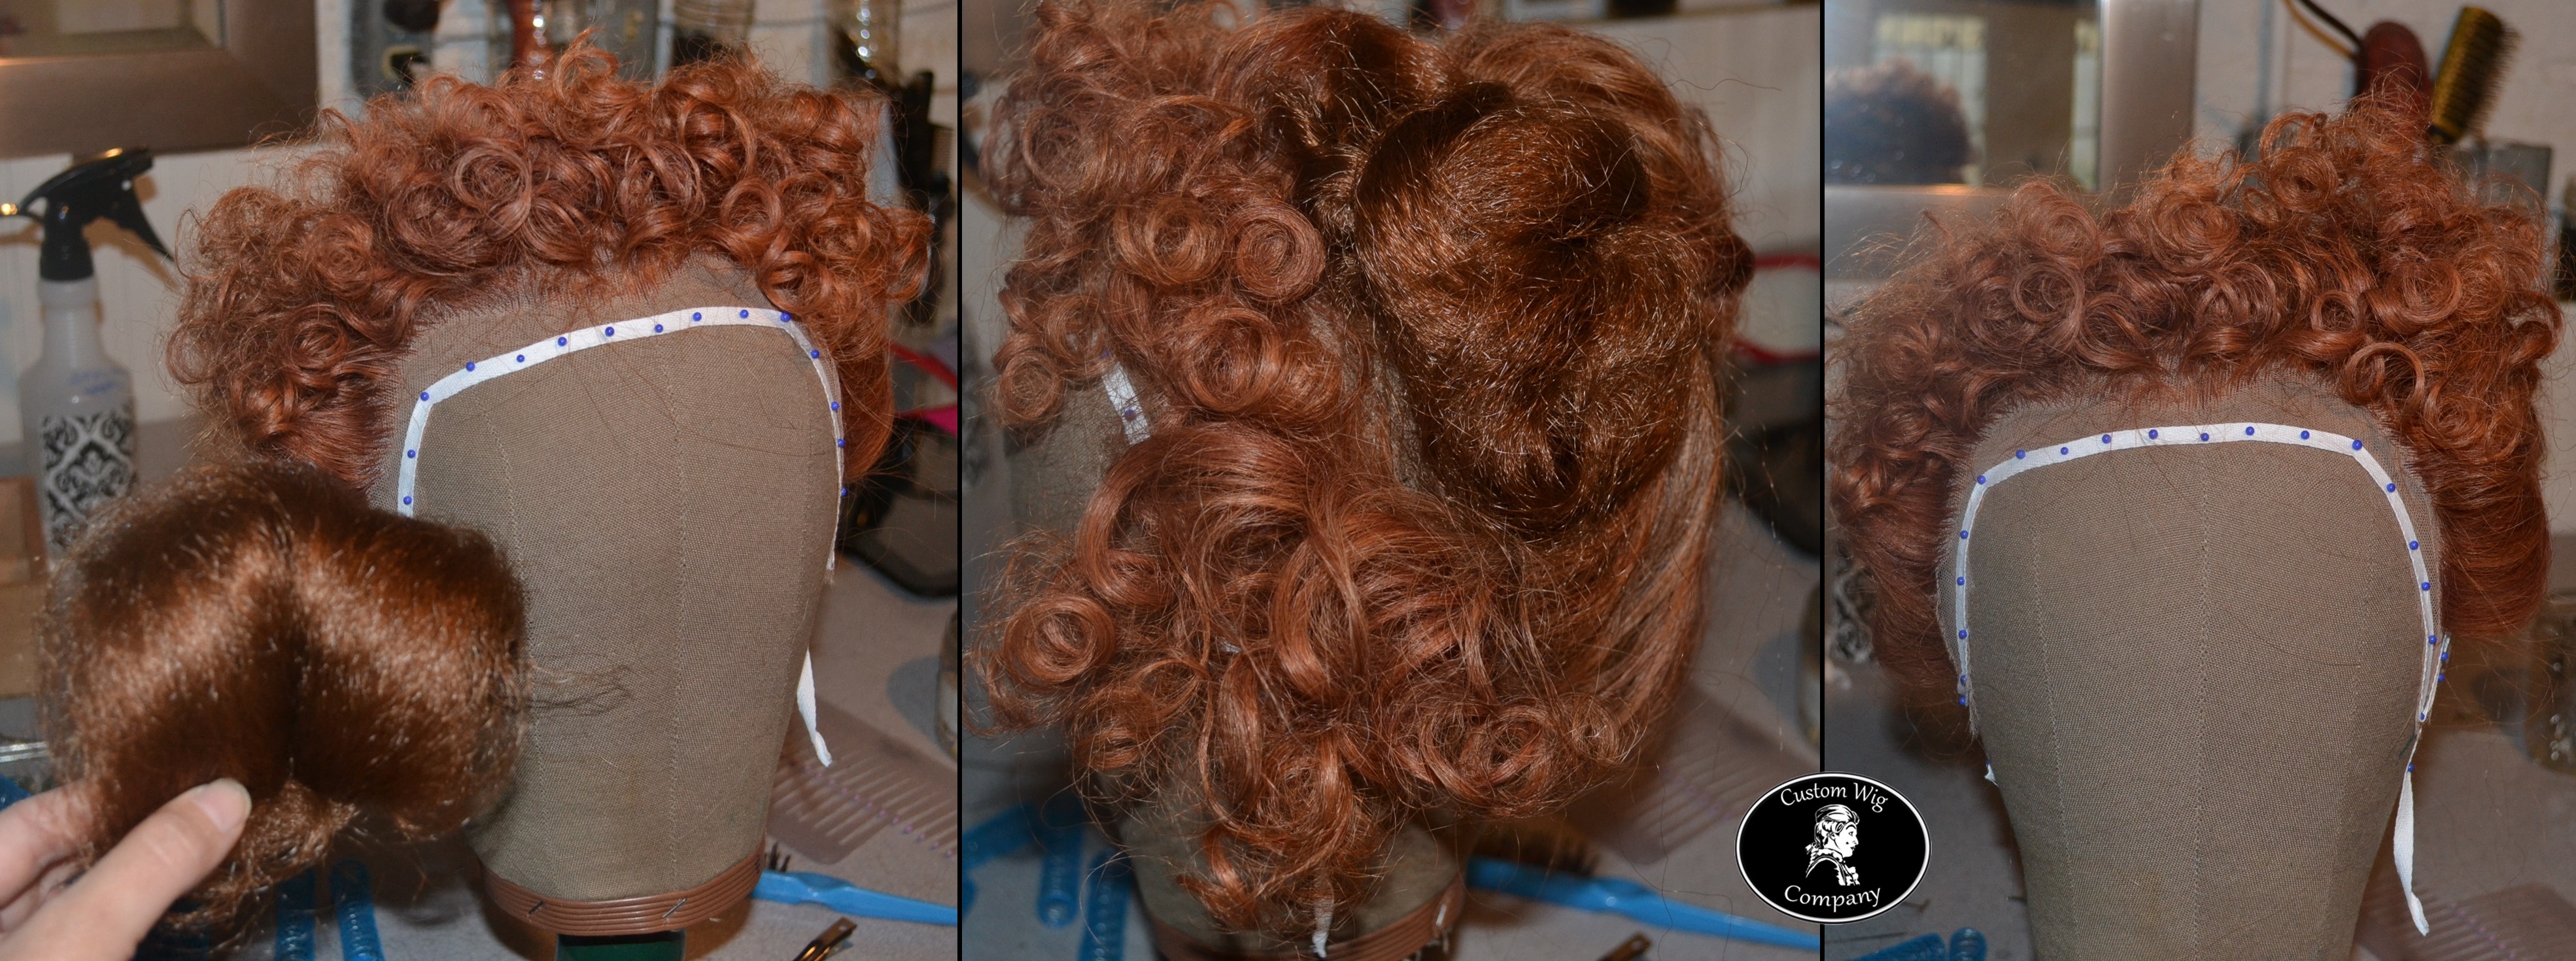
The goods news is that you can make a rat, which is just a pad of hair or netting, from many sources, including your own hair that you save from your brushes and combs. I chose to make a pair of rats from very long, inexpensive synthetic hair called kanekelon – available for $3 a pack at most beauty supply stores. I divided half of the back into two pieces, tied them into a knot, and then pinned them to the wig. You can see the progression in the photos below.
To the left, above, you can see the rat I made and the hairstyle without any augmentation. The center images show the rat, pinned into the hair and ready to have the curls dressed over it. The right images shows the curls dressed over the rat. You can see what a difference in the scale and silhouette the rat makes when you compare the two sides of the wig!
Once you have the rats in place, you can dress the curls over them, and then adjust your roll and bun as needed. I put the rats in place, and then I chose to adjust the roll so it had more a V shape – you can see that in the third photo below. I wanted to give some decoration to that part of the wig since I don’t have the large cap to put on it. Below is the finished style, from a variety of angles.
The rats have an added function – they help keep those delicate looking curls in place and prevent their drooping and falling by providing support.


Leave A Comment